Steps to setup wireless communication
1. Wireless adaptor for PC:
Such as build in wireless devices for PCs, PCMCIA wireless card or USB wireless devices that complies 802.11b (WiFi) wireless networks
2. Access point:
802.11b (WiFi) wireless Access points or outers that can broadcast wireless signals.
3. Enabling the Wireless LAN function
In order to enable the AIBO ’s
wireless LAN function, turn the wireless switch on its body
to ON.
If the AIBO robot is still operating, first press the pause
button to put the AIBO robot in Pause mode.
1 Hold the AIBO robot firmly, turn it upside
down, and open the cover.
• When lifting the AIBO robot, always hold it by its body, and not
its extremities. (Those with small hands may have difficulty
handling the AIBO robot.)
• Do not touch the charging contacts on the AIBO robot’s stomach
with your bare hands. Touching the contacts will reduce contact
quality.
2 Slide the wireless switch to ON, and close the
cover.
Caution
4. AIBO WLAN Manager software CD
AIBO WLAN Manager Software CD that comes with AIBO
5. AIBO Programming Memory Stick
When you buy this stick, the model number is "ERA-MS008" for the 8MB size or "ERA-MS016" for the 16MB size. Availability varies by country.
l Not 32 MB commercial AIBO MIND(ERF – 7AW01E) Memory Stick.
5. SONY Memory Stick Card Reader
l SONY brand strongly recommended, otherwise may cause Memory Stick damanged.
1. Copy the Redist7/Eng/OPEN-R folder from Redist7_ver1.zip to the root (Ex. E:\)
folder on your AIBO Programming Memory Stick.
2. Installing the “AIBO WLAN Manager”
Install the “AIBO WLAN Manager” on your PC.
Insert the CD-ROM included with the AIBO ERS-7 into your CD-ROM drive.
The installer will automatically start.
If the installer does not start, double-click the “Setup.exe” file in the “SETUP” folder on the CD.
Follow the on-screen instructions to install the software.
Windows XP operating system users must install Universal Plug and Play in order to use the AIBO robot’s search
function. Use the following procedure to install Universal Plug and Play.
1 Click “Start” Control Panel”.
2 Select “Add/Remove Programs” “Add/Remove Windows Components”.
3 In the “Components” list, select the “Network Services” check box, and then click “Details”.
4 Select the “Universal Plug and Play” check box, and then click “OK”.
If you used a CD to install the Windows operating system, you will be prompted to insert it into your computer.
5 Click “Next” to start installation.
6 When the “Completed the Windows Components Wizard” screen appears, click “Finish”.
Installation of Universal Plug and Play is now complete.
7 Close the “Add/Remove Programs” window.
8 Close the “Control Panel” window.
3. Configuring network settings with
“AIBO WLAN Manager”
Using the “AIBO WLAN Manager”, you can configure the
AIBO MIND software “Memory Stick™” media to match
your network device settings.
1 If using the Windows® XP operating system,
click “Start” “All Programs” “AIBO
WLAN Manager” “AIBO WLAN
Manager”.
If using an operating system other than Windows XP,
click “Start” “Programs” “AIBO WLAN
Manager” “AIBO WLAN Manager”.
The “AIBO WLAN Manager” starts, and the “AIBO
WLAN Manager” dialog box appears.
2 Insert the AIBO MIND software “Memory
Stick” media into the “Memory Stick” media
reader/writer.
Caution
Make sure the AIBO MIND software “Memory Stick” media
Safety switch is not in the “LOCK” position. If the switch is set to
“LOCK”, then the AIBO ’s network settings
and pictures will not be stored.
3 Configure each setting to match your network
environment, and click Write.
Configuration options will differ depending on whether
your network is using a DHCP Server*.
The DHCP server allows an IP address to be
automatically allocated to a device on the network.
* For details on DHCP server functionality, refer to the instruction
manuals included with your modem or access point.
Use the following procedure to confirm not you are using a DHCP server
in your network environment
(This procedure is for the Windows® XP operating system only. If using another operating system, consult its Help.)
1 Click “Start” “Control Panel”.
2 Click “Network and Internet Connections” “Network Connections”.
3 Right-click either “Wireless Network Connection” or “Local Area Connection”, and select “Properties”.
4 On the “General” tab, select “Internet Protocol (TCP/IP)” under “This connection uses the following items”.
Click “Properties”.
5 Confirm your settings.
If “Obtain an IP address automatically” is selected
The DHCP server function is in use.
When using a DHCP server network environment
Configure settings on the “Easy” tab.
When using a DHCP server, changes to the “Advanced” tab are unnecessary.
![]()
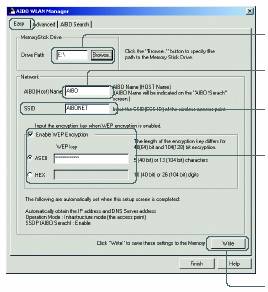
1 Click the “Browse” button, and specify the drive where the AIBO MIND
software “Memory Stick™” media is set (e.g. “S:” drive).
2 The name that you enter here will appear as the “AIBO Name” on the “AIBO
Search” tab. This name can be up to 8 alphanumeric characters and
must contain at least one letter.
3 Enter the network name (SSID) used by the wireless LAN access point.
(Maximum of 32 characters. Only alphanumeric characters and symbols are
allowed.)
4 Configure if using WEP. (If not using WEP, no settings are
necessary.) If using WEP, select the “Enable WEP Encryption” check box, and
enter the passkey (WEP) used by the access point. Alphanumeric passkeys
must be 5 or 13 characters. Hexadecimal passkeys must be 10 or 26
characters.
Example Configuration
5 Confirm your settings, and click this button.
Alphanumeric Hexadecimal
WEP64 (40 bit) AIBO2 4149424f32
WEP128 (104 bit) ENTERTAINMENT 454e5445525441494E4d454e54
If “Use the following IP address” is selected
You are not using a DHCP server.
In this case, use the following steps to manually assign your AIBO an IP address.
Make a note of your PC’s IP address displayed under “Use the following IP address”. Choose an IP address
for your AIBO robot that does not conflict with this.
E.g. Your PC’s IP address: 192.168.0.10
Your AIBO robot’s IP address: 192.168.0.11, etc. (anything other than 192.168.0.10)
When not using a DHCP server in your network environment
Configure settings in the “Advanced” tab.

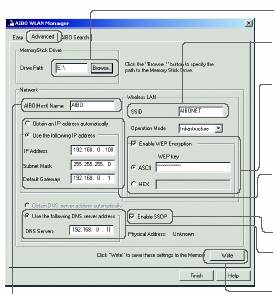 When
not using a DHCP server, changes to the “Easy” tab are unnecessary.
When
not using a DHCP server, changes to the “Easy” tab are unnecessary.
1 Click the “Browse” button, and specify the drive where the AIBO MIND
software “Memory Stick™” media is set (e.g. “S:” drive).
2 Enter the network name (SSID) used by the wireless LAN access point.
(Maximum of 32 characters. Only alphanumeric characters and symbols
are allowed.)
3 Configure if using WEP. (If not using WEP, no settings are
necessary.) If using WEP, select the “Enable WEP Encryption” check
box, and enter the passkey (WEP) used by the wireless LAN access
point. Alphanumeric passkeys must be 5 or 13 characters. Hexadecimal
passkeys must be 10 or 26 characters.
4 Select “Use the following IP address”, and fill in the following fields:
• Enter the IP address* that the AIBO is using.
• Enter the subnet mask that the AIBO robot is using.
• Enter the IP address of the device that is acting as a router.
5 Select the “Enable SSDP” check box.
6 Select this option and enter the IP address of the device that is acting as
a router.
7 Confirm your settings, and click this button.
The name that you enter here will appear as the
“AIBO Name” on the “AIBO Search” tab.
This name can be up to 8 alphanumeric
characters and must contain at least one letter.
4. Click Finish to close the “AIBO WLAN
Manager” dialog box.
You’ve completed this process! You can now
communicate with your AIBO® Entertainment Robot
wirelessly!
5. Authentication with ID and password is enabled by default. To disable
authentication:
Delete
/OPEN-R/APP/DATA/P/OWNER.TXT
and create
/OPEN-R/APP/PC/AMS/NOAUTH.CFG
Now an ID and password will not be required.
The contents of NOAUTH.CFG can be anything (size=0 is recommended)
If you want to make a Windows application using authentication, please use
the NsmAuth library.
Please note that if no authentication is done or network security is not
properly set, other PCs may have access to your AIBO.
6. * If you have R-CODE.R file in your Memory Stick /OPEN-R/APP/PC/AMS/R-CODE.R, Delete the /OPEN-R/APP/PC/AMS/R-CODE.R file on the AIBO Programming
Memory Stick. (For testing, the program that is executed just after
booting AIBO should be deleted)
7. Remove the AIBO MIND software “Memory Stick™”
media from the reader/writer. Insert it into the AIBO®
Entertainment Robot, and press the pause button on the
AIBO robot’s back to activate the AIBO robot.
8. Once your AIBO robot is activated, go to the “AIBO Search” tab in the “AIBO WLAN Manager” dialog
box, and click Search.
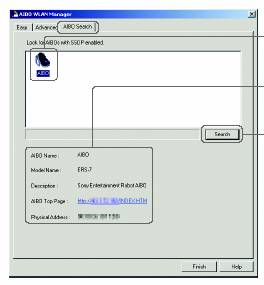 An
icon appears if the AIBO robot is on the same network as your PC.
An
icon appears if the AIBO robot is on the same network as your PC.
An icon will appear only if the “Enable SSDP” check box is selected.
When you click an AIBO icon in the list above, information for that
AIBO robot is displayed.
After clicking “Search”, the AIBO robots using the same network
as the PC are shown.
Click this button.
Hints
• If the AIBO icon does not appear even after clicking the “Search” button,
then the PC cannot communicate with the AIBO robot wirelessly.
Confirm the settings on the “Easy” and “Advanced” tabs. Also, check that
the wireless switch (page 7) on the AIBO robot’s body is set to ON.
• Windows® XP operating system users must install Universal Plug and
Play in order to use the AIBO search function.
9. Try ping <AIBO's IP address>
If the connection fails:
Please check the Wireless LAN setting of AIBO. WLAN Manager is
included on the AIBO MIND CD-ROM and can help you with AIBO's wireless LAN setting.
If your AIBO gets an IP address by DHCP, please enable SSDP (SSDP_ENABLE=1).
WLAN Manager can find your AIBO by using an AIBO search.
10. You can send a program written in R-CODE to AIBO via wireless LAN
transmission.
Specifications for the connection are as follows:
Connection port : 21002 tcp
Protocol : no flow control
Code : 8 bit ASCII
Don't forget the port number (21002) after AIBO's IP address when you use telnet.
Sample (using telnet)
------------------------------------------------------------------
If you use other Windows version than Windows XP:
C:\>telnet 10.0.1.1 21002 <== DOS prompt
If you use Windows XP:
C:\>telnet
Microsoft Telnet>open 10.0.1.1 21002
============================================
R-CODE ver2.0 (2004/05/01) <== A header like this will
============================================ be displayed when a connection
string_buf 1 * 256K = 256K (used 0.1%) is made.
dictionary 8 * 32K = 256K (used 0.7%)
stack 4 * 32K = 128K (used 0.3%)
statement 24 * 32K = 768K (used 0.0%)
on_call 12 * 64 = 768 (used 0.0%)
============================================
free mem. 6998912
============================================
<READY> <== You can input from here.
PLAY:ACTION:STAND <== You can execute the command "stand" directly.
EDIT <== Your program can be sent from EDIT to END.
FOR:i:1:10 <== This program repeats the motion
PLAY:ACTION:SIT "sit and stand" 10 times.
WAIT
PLAY:ACTION:STAND
WAIT
NEXT
END
RUN <== Run your program.
...
@DISS <== @DISS cuts the Connection.
C:\>
------------------------------------------------
VDUMP - Displays a variable's value
Outputs a variable's value to the console.
This function is used for debugging when connected via WLAN.
PRINT - Print (for online debugging)
Display messages using a method similar to the printf() command in C/C++.
This function is used for debugging when connected via WLAN.